The Yummy Bites Pro plugin includes advanced addons designed to enhance site performance, provide options for adding custom code, uploading custom fonts, and offering many other features. Explore the list of available addons below.
Performance #
The Performance addon provided by the Yummy Bites Pro plugin helps you in improving your website performance and make your website load faster.
Activating the Performance addon #
You can access the Performance addon via Admin Dashboard > Appearance > Yummy Bites > Addons. Then click to enable the Activate option to get the Performance addon to work.

Configuring Performance Settings #
Once the Performance addon is activated, you can configure the Performance Settings for your website via Admin Dashboard > Appearance > Customize > Additional Settings > Performance Settings.
Yummy Bites Pro plugin offers optimization options for the following elements of a website.
- Images
- WordPress
- CSS/JS Optimization
- Elementor
Images #

Lazy Load Images: Enable this option to activate Lazy loading for your site images.
Exclude Lazy Load Images: You can enable this option to exclude images from lazy loading.
Excluded images list: This option is visible only when the Exclude Lazy Load Images option is enabled. Enter keywords (e.g. image filename, CSS class, domain) from the image to be excluded (one per line).
Exclude Above-the-fold Images: You can select the number of images on the homepage from the top for which you want to exclude the lazy loading.
Lazy Load Animation: Select animation effect for the lazy loading images. This option is only visible when the Lazy Load Images option is enabled.
Lightbox for Images and Galleries: You can enable the lightbox feature for your images.
Add Missing Image Dimensions: Enabling this feature will add width and height attributes to the images to improve the CLS.
WordPress #

Prevent Automatic Favicon Request: Enabling this option will disable the automatic favicon request to speed up your site.
Remove Emojis script: You can remove WordPress Emojis JavaScript file from your website frontend.
Disable Self Pingbacks: Enabling this option will disable Self Pingbacks (generated when linking to an article on your own blog).
Disable RSS Feeds: Enable this option to disable WordPress generated RSS feeds and 301 redirect URL to parent.
Remove RSS Feed Links: Enable this option to disable WordPress generated RSS feed link tags.
Disable Embeds script: Enabling this option will remove WordPress Embeds Javascript file.
Load Gravatar Locally: You can enable this option to load Gravatars from your own server that will help improve loading time.
CSS/JS Optimization #

Ver parameters: Enable this option to remove version query strings from your static resources to improve the caching of those resources.
Defer JavaScript: Enable this option to add “defer” attribute to script tags, which improve page download speed.
Delay JavaScript Files: Enabling this option will improve the loading speed by delaying the loading of JS files until user interaction such as click, scroll, etc.
Elementor #
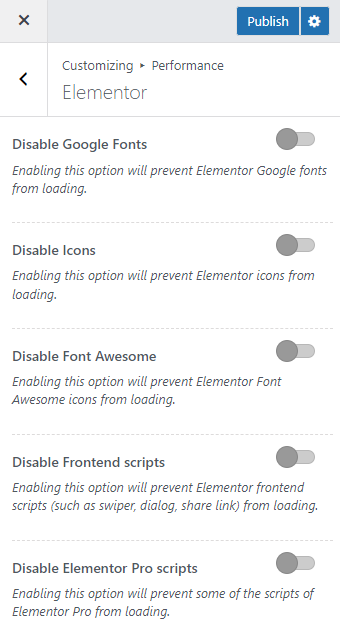
Disable Google Fonts: Enabling this option will prevent Elementor Google fonts from loading.
Disable Icons: Enabling this option will prevent Elementor icons from loading.
Disable Font Awesome: Enabling this option will prevent Elementor Font Awesome icons from loading.
Disable Frontend scripts: Enabling this option will prevent Elementor frontend scripts (such as swiper, dialog, share link) from loading.
Disable Elementor Pro scripts: Enabling this option will prevent some of the scripts of Elementor Pro from loading.
Customizer Reset #
The Customizer Reset addon provided by the Yummy Bites Pro plugin adds a Customizer Reset option in the Yummy Bites theme customizer. With the Customizer Reset option, you can reset all the settings added to the customizer back to its default settings.
Activating the Customizer Reset addon #
You can access the Customizer Reset addon via Admin Dashboard > Appearance > Yummy Bites > Addons. Then click to enable the Activate option to get the Customizer Reset addon to work.

Configuring Customizer Reset Settings #
Once the Customizer Reset addon is activated, you can access the Customizer Reset setting via Admin Dashboard > Appearance > Customize > Additional Settings > Customizer Reset.

You can simply click on the Reset button to restore the customizer settings back to its default state.
Content Protection #
Content Protection is a premium addon offered by the Yummy Bites Pro plugin, designed to safeguard your valuable content. With this feature, you can easily apply content protection to pages, posts, or across your entire site. In an era where online content is frequently copied and misused without permission, this tool provides a reliable defense against content theft. By enabling this feature, you can ensure that your original work remains protected and cannot be duplicated or republished by unauthorized users.
Activating the Content Protection addon #
You can access the Customizer Reset addon via Admin Dashboard > Appearance > Yummy Bites > Addons. Then click to enable the Activate option to get the Content Protection addon to work.

Configuring Content Protection Settings #
Once the Customizer Reset addon is activated, you can access the Customizer Reset setting via Admin Dashboard > Appearance > Customize > Additional Settings > Content Protection.
General #
Enable Content Protection: Toggle this option to activate content protection on your site.
Post Types: Select where you want to apply content protection—whether on posts\recipes, pages, or across the entire site.
Protection Message: Enter the custom message you’d like to display when content protection is triggered.

Design #
Content Color: Select a color for the content text.
Content Icon Color: Choose a color for the icons.
Content Background Color: Pick a background color for the content.

This is how content protection will display on frontend.

News Ticker #
The News Ticker addon provided by the Yummy Bites Pro plugin provides a horizontal, infinite-loop data displaying recipe titles, posts littles or any other information. This helps visitors to obtain valuable information quickly and easily.
Activating the News Ticker addon #
You can access the News Ticker addon via Admin Dashboard > Appearance > Yummy Bites > Addons. Then click to enable the Activate option to get the News Ticker addon to work.

Configuring News Ticker Settings #
Once the Customizer Reset addon is activated, you can access the News Ticker setting via Admin Dashboard > Appearance > Customize > Additional Settings > News Ticker.
General Setting #
The following are the different settings provided under the General Settings tab:
Show News Ticker: Enable this option to display the News Ticker section on the Blog page.
Tabs: Select whether you want the tabs to be displayed in the default style or in full-width layout.
NewsTicker Layouts: Choose a layout for the News Ticker from the available layouts.
News Ticker Label: Enter the News Ticker label.
Show Icon: Enable to display the icon for the News Ticker section.
Type: Select your preferred icon.
Icon Size: You can select a preferred size for the icons.
Posts Filter: Select the posts filter for the News Ticker section.
Post Category: Select the post category for the News Ticker section. This option is available if you select Post Filter to Category.
Number of posts: Select the number of posts you want to display.
Location: Select the location for the News Ticker.
Shortcode: You can use the below shortcode to display the news ticker on your website.
[news_ticker]Visibility: Select the devices where you would want to display the News Ticker.

Design Setting #
The following are the different options provided under the Design settings tab:
Title Color: Select the font color for the News Ticker label.
Title Background Color: Select the background color for the News Ticker label.
Content Color: Select the font and background color for the news headline.
Content Background Color: Select the background color for the news headline.
Navigation Button Color: Select the background and hover color for the news navigation button.
Navigation Button Hover Color: Select the hover color for the news navigation button.

News Ticker Front End View #
When you have enabled the News Ticker feature, this is how it will be displayed on the front end.

Custom Script #
The Custom Scripts is a premium addon provided by the Yummy Bites Pro plugin. It allows you to inject custom code snippets to the header, body and footer file of your entire website. This feature removes the hassle of manually editing the theme files or adding any third party plugins to add custom codes.
Activating the Custom Scripts addon #
You can access the Custom Scripts addon via Admin Dashboard > Appearance > Yummy Bites > Addons. Then click to enable the Activate option to get the Custom Scripts addon to work.

Configuring Custom Scripts Settings #
- Navigate to Admin Dashboard > Appearance > Customize > Additional Settings > Custom Scripts.
- Enter your header, body or footer scripts in the respective field.
- Click Publish.

Custom Fonts #
The Custom Fonts is a premium extension provided by the Yummy Bites Pro plugin. With this extension, you can upload your preferred custom fonts easily to your website. The uploaded fonts will be displayed across all the Typography options provided by the theme. The extension supports TTF and WOFF2 fonts.
Activating the Custom Fonts Addons #
You can access the Custom Scripts addon via Admin Dashboard > Appearance > Yummy Bites > Addons. Then click to enable the Activate option to get the Custom Fonts addon to work.

Configuring Custom Fonts Settings #
After enabling the Custom Fonts extension, click on Configure. A pop-up will appear allowing you to upload your desired font file via Custom Font Settings.

The extension provides you with the option to upload a custom fonts and edit them.

You can choose the uploaded fonts via Customize > General Settings > Typography.
Sidebar Blocks #
The Sidebar Blocks is a premium extension provided by the Yummy Bites Pro plugin. By enabling the Sidebar Blocks addon, you get access to blocks such as Recent Posts, Popular Posts, Categories, and many more that you can further add to the sidebar of your website.
Activating the Sidebar Blocks addon #
You can access the Sidebar Blocks addon via Admin Dashboard > Appearance > Yummy Bites > Addons. Then click to enable the Activate option to get the Sidebar Blocks addon to work.

The following are the list of blocks provided by the Sidebar Blocks addon that you can add to your website sidebar via Admin Dashboard > Appearance > Widgets.
- Recent Posts
- Popular Posts
- Categories
- Advertisement
- Author Bio
- Posts Tab

Progress Bar #
The Custom Fonts is a premium extension provided by the Yummy Bites Pro plugin. With the Progress Bar addon, you can display a progress bar that will indicate the amount of content your have read through in a website recipes/posts or pages.
Activating the Progress Bar Addon #
You can access the Progress Bar Extension via WordPress Dashboard > Appearance > Yummy Bites > Addons. Then activate the toggle to get the Progress Bar addon to work.

Configuring Reading Progress Bar Settings #
You can configure the Reading Progress Bar Settings for your website via Appearance > Customize >Additional Settings > Progress Bar.
General Setting #

The following are the different settings provided under the General Settings tab:
Thickness: You can adjust the thickness of the Progress Bar here.
Tabs: You can choose whether you would like to display the Progress Bar only on page or posts or the entire website.
Position: Here you can set the position for the Progress bar.
Design Setting #

Here you can set the Progress color for the Progress bar.
Notification Bar #
The Notification Bar is a premium addon provided by the Yummy Bites Pro plugin that allows you to display status information of any particular event or offer or highlight any other helpful piece of information for your site visitors.
Activating the Notification Bar Addons #
You can access the Sidebar Blocks addon via Admin Dashboard > Appearance > Yummy Bites > Addons. Then click to enable the Activate option to get the Notification Bar addon to work.

Configuring Notification Bar Section Settings #
You can configure the Notification Bar Settings for your website via Appearance > Customize > Additional Settings > Notification Bar Sections.
General Setting #

The following are the different settings provided under the General Settings tab:
Show Notification Bar: You need to enable this option to display the notification bar on your website.
Title: Enter the title of the section.
Button Label: Enter the CTA button label here.
Button URL: Enter the URL to which you want the CTA button to link to.
Open in New Tab: Enable this option to open the button URL in the new tab.
Hide on Mobile: Enable the toggle to hide notification bar from Mobile device.
Design Setting #
The following are the different settings provided under the Design Setting tab:
Typography: You can configure the typography settings for the notification text here.
Background Color: You can select a background color for the notification bar here.
Text Color: Select the text color for the notification text.
